
Freestanding Tub Filler Plumbing: The Rough-In Most Homes Miss
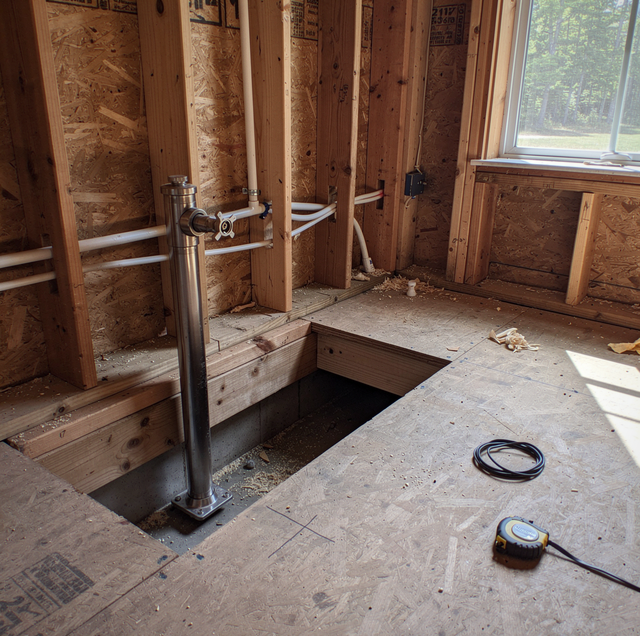
A freestanding tub looks like a simple swap on paper. Pull the old alcove tub, drop in the new one, connect a filler, done. Then the plumber shows up to rough in supply lines, and the first question is where the tub will actually sit, because a freestanding filler isn't forgiving about position the way a wall-mounted tub-and-shower valve is. Get the rough-in location wrong by even an inch or two, and the spout either won't reach over the rim, or it lands off-center in a way that's obvious every time you look at it.
That precision is the part homeowners underestimate. A freestanding tub filler, whether it rises out of the floor or drops down from the wall, has to be positioned against a tub that hasn't been delivered yet, on a floor that hasn't been finished yet, with a drain and vent path that has to work with wherever the tub ends up. Every one of those pieces has to be decided and locked in before the framing closes, the tile goes down, or the concrete gets patched.
Floor-Mount Vs Wall-Mount Rough-In Differences
The two common ways to plumb a freestanding filler behave differently underground, and the choice changes what the rough-in crew needs from the rest of the job.
A floor-mount filler runs supply lines up through the floor near where the tub's faucet deck or a matching floor plate will sit. The valve body itself typically lives below the floor in a valve box, with a riser pipe extending up to meet the faucet column. This setup demands an exact X-Y position measured from the tub's actual faucet hole location, not an approximate spot near the tub. Move the tub two inches after the riser is set, and the spout ends up over the rim or the deck instead of over the water.
A wall-mount filler routes supply lines through a finished wall at a set height above the tub rim, with the tub positioned in front of it rather than the filler positioned relative to the tub's deck. This version depends on knowing the tub's rim height and its final distance from the wall before the stub-outs get set, since both numbers decide whether the spout clears the rim without splashing over the side.
Floor-mount setups suit a tub sitting away from every wall, the classic freestanding look. Wall-mount setups suit a tub placed close to one wall, and they're generally the easier retrofit since the plumber doesn't have to open a floor. Neither is universally better: floor-mount offers more flexibility in tub placement later, while wall-mount is simpler to service since the valve sits behind an accessible wall rather than under a floor that may already be tiled.
Why Supply-Line Placement And Floor Structure Matter
Supply-line placement for a freestanding filler isn't just about getting water to the tub. It's about hitting a specific point that matches the tub manufacturer's spec sheet or template, because every freestanding tub has its own faucet-hole location relative to the drain, and that location varies between models even when two tubs look similar from across the room.
Floor structure matters for a second reason: a floor-mount valve box and riser need blocking or support below the subfloor so the riser doesn't flex when the tub is bumped or when someone leans on the deck around it. Freestanding tubs aren't anchored to a wall the way an alcove tub is, so the riser and its connection point take more incidental load over the life of the fixture than most homeowners expect. A riser set into an unsupported section of subfloor, or one resting on nothing but the finished floor covering, is a common point of failure years down the road, not because the valve itself fails, but because the pipe was never given anything solid to bear against.
There's also a structural question specific to older framing: joist spacing and any existing plumbing chase have to be checked before a hole gets cut for a riser, since cutting into or near a load-bearing joist to route a supply line is a different job than drilling through open bay space. A plumber working from the tub's template can usually route around framing members with minor adjustment; a plumber working blind, without the actual tub or its spec sheet on hand, is guessing at a location that framing may not even accommodate.
Coordinating With Tile And Flooring Contractors
This is where a freestanding filler installation most often goes sideways, since the plumbing and the finished floor are handled by two different trades on two different schedules, and the tub's final position depends on both.
The floor-mount riser or the wall stub-out has to be set at a height and position that accounts for the finished floor buildup, not the bare subfloor. Tile plus mortar bed adds real thickness, sometimes close to an inch depending on the setting method, and a riser cut to the wrong final height either sits too short once tile goes down or protrudes too far and has to be cut back on-site. Either mistake is avoidable with one conversation between the plumber and the flooring contractor before either trade starts cutting.
The reverse coordination matters too. A floor-mounted valve typically requires an escutcheon or floor plate that the tile layout must work around, plus a small access point for future service. If the tile contractor sets a continuous field with no plan for that plate or access, the plumber is left working around finished tile that may need cutting into later. The fix: the plumber sets the exact rough-in location and the finished-floor height assumption, the tile layout gets planned around that point, and nobody discovers a mismatch after the floor is grouted.
Venting Considerations For A Freestanding Filler
The filler supplies water, but the tub still has to drain, and that side of the job has its own requirements that a freestanding installation makes more visible than an alcove tub does.
Every tub drain needs a properly sized trap and a vent connection within the allowed distance from that trap, standard requirements that don't change just because the tub sits in the middle of the room instead of against a wall. What does change is the routing. An alcove tub usually drains straight down into an existing waste line close to the wall it backs up against. A freestanding tub, especially one placed away from every wall as part of a remodel, often needs its drain and vent rerouted to reach that same waste stack from a new position, which can mean a longer run under the floor or a modified vent path to stay within code-required distance from the trap.
Toe-tap and click-clack drain mechanisms, common on freestanding tubs, also need enough vertical clearance below the tub to operate correctly, which affects how the drain rough-in gets planned relative to the floor structure below. A drain assembly with too little clearance can bind or fail to seat properly, an issue that's much easier to catch during rough-in than after the tub is set and full of water.
Common Mistakes That Cause Leaks Or A Faucet That Doesn't Reach
Most of the problems that show up after a freestanding tub filler installation trace back to a handful of recurring mistakes, all of which are avoidable with the right sequencing.
- Roughing in before the tub is confirmed: Working from a showroom photo or a generic spec instead of the actual tub's manufacturer template is the single biggest cause of a filler that lands in the wrong spot. Faucet-hole location, rim height, and tub footprint vary enough between models that "close enough" is rarely the case.
- Ignoring finished-floor height: Setting a riser or wall stub-out to the bare subfloor height without accounting for tile, mortar, or underlayment leaves the filler sitting at the wrong height once the floor is done.
- No access point for a floor-mount valve: Tiling over a valve box with no removable panel turns a simple future repair into a floor demolition project.
- Skipping structural support under the riser: A riser without blocking beneath it can develop a slow leak at the connection point from repeated flex, showing up as water staining on a ceiling below long after the install is finished.
- Not rechecking drain and vent distance after moving the tub: A tub relocated away from its original alcove position changes the trap arm length and vent path, and that recalculation gets skipped more often than it should when a remodel is treated as a straight fixture swap.
- No accessible shutoff: A freestanding filler without a serviceable shutoff means any future repair, even a simple cartridge replacement, requires cutting into a wall or floor that could have had access built in from the start.
Planning The Rough-In Before The Tub Arrives
The pattern across all of these issues is the same: a freestanding tub filler rough-in has to be planned around the specific tub, the finished floor height, and the drain path the tub will actually use, not on a generic assumption about where a tub "usually" goes. That means having the tub's spec sheet or physical template on-site before supply lines get set, agreeing on finished-floor height with whoever is handling tile, and building in a service point before anything gets covered up.
None of that is complicated on its own. It just has to happen in the right order, with the plumber, the tub specifications, and the flooring plan all lined up before the floor or wall closes for good. A freestanding tub is one of the more visible upgrades in a bathroom remodel, and the rough-in behind it is the part nobody sees again once the tile is down, which is exactly why it's worth getting right the first time rather than reopening a finished floor to fix a spout that's six inches short of where it needs to be.
Frequently Asked Questions
There's no single number, since it depends on the tub's faucet-hole offset from its edge, but many floor-mount installations set the riser somewhere in the 4 to 8-inch range off the tub's centerline toward the room, verified against the manufacturer's template rather than a rule of thumb. The template determines the actual number for a given tub.
Yes, but it usually means coring the slab to route the riser rather than working within open joist bays, which adds time and requires knowing where any embedded electrical, radiant heat lines, or existing plumbing runs sit before cutting. A wall-mount filler routed through a nearby stud wall is often the simpler path on slab construction, since it avoids cutting the slab at all.
A rough-in template is a paper or cardboard pattern, sometimes a plywood cutout, supplied by the tub manufacturer showing the exact drain and faucet-hole locations for that specific model. Most quality freestanding tubs ship with one, or have it available as a downloadable spec sheet; a tub with no template on file is a signal to take exact measurements from the physical tub itself before any pipe is set.
A well-planned installation includes a removable access panel, often a small trapdoor-style cover set into the floor near the tub or a panel in an adjacent closet or crawlspace wall, that lets a plumber reach the valve body without cutting tile. Installations without that access point typically require removing a section of flooring around the tub to reach the valve.
Most quality valve bodies include integral stops, but where those aren't built in, a separate set of accessible shutoffs should be added during rough-in, ideally reachable from a basement, crawlspace, or access panel rather than buried behind finished material. Without one, even a minor drip repair can mean shutting down water to the whole house.
Having the actual tub, or its confirmed manufacturer template, on-site before rough-in avoids most placement mistakes. Setting supply lines from a catalog image alone, before the tub is confirmed, is one of the more frequent reasons a spout ends up misaligned once everything is installed.
Schedule a freestanding tub filler consultation — we'll confirm your tub's template, plan the supply line and drain rough-ins, and coordinate timing with your flooring contractor before anything gets covered up. AT Plumbing Services serves Scarborough, South Portland, Portland, and surrounding areas. Call (207) 707-3170.
